
My arms are pretty chubby so it was obvious I was going to need to do some modifications to the pattern. After much ripping back, consultations to my stitch libraries and searching Ravelry for tips on this pattern I finally came up with my own. I also carefully documented all my changes so that all you others with chubby arms can make these gloves without all the frogging. You can see my project here.
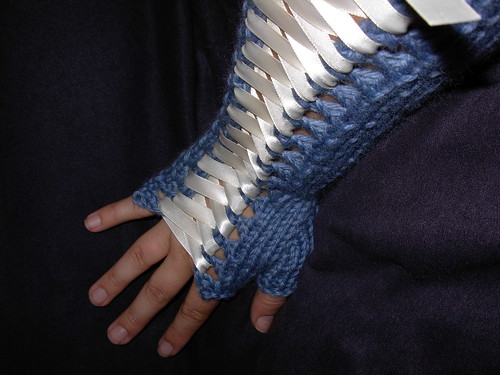
Lace Up Opera Gloves for Chubby Arms
~ a modified pattern by Caliope
Materials & Tools
Bulky Weight Yarn (100 grams/137 yards) I used the bulky weight wool from Unwind the Yarns
Ribbon (I am not sure yet how much, I will update when I know but I am guessing 4m per arm)
6.00mm Straight Needles
6.00mm DPNs
Stitch Holder or Scrap Yarn
2 Stitch Markers
Gauge
16 stitches and 20 rows = 4" stockinette (at least that's what mine is before blocking).
Abbreviations
m1 = make 1, I used a raised increase (knit into the bar across the back of the next stitch)
pm = place marker (yes, I actually had to look this one up)
ssk = slip next stitch knitwise, then next stitch purlwise then knit them together thru back loops
Pattern
co 25 stitches
Row 1: knit
Row 2: purl
Row 3: *yo, k2tog* repeat ** to last 2 sts, k2
Row 4: sl1, purl to end
Row 5: knit picot hem (fold cast on row behind needle, knit into each stitch on needle together )with cast on stitches
Row 6: sl1, purl to end
Eyelet Repeat
Note: all even numbered rows: sl1, purl to end, except last row!
Row 7: sl1, k1, yo, k2tog, k to last 4 sts, ssk, yo, k2
Row 9: sl1, knit to end
Row 11 - 54: Repeat rows 7 - 10, 11 more times
Row 55 - 56: Repeat row 7 & 8 only
Hand
Row 57: sl1, k2, ssk, k to last 5 sts, k2tog, k3
Row 59: sl1, k1, yo, k2tog, ssk, k to last 6 sts, k2tog, ssk, yo, k2
RIGHT HAND ONLY Row 61: sl1, k3, m1, k to last 5 sts, m1, k2tog, k3
LEFT HAND ONLY Row 61: sl1, k2, ssk, m1, k to last 4 sts, m1, k4
RIGHT HAND ONLY Row 63: sl1, k1, yo, k2tog, k3, pm, m1, k2, m1, pm, k9, ssk, yo, k2
LEFT HAND ONLY Row 63: sl1, k1, yo, k2tog, k9, pm, m1, k2, m1, pm, k3, ssk, yo, k2
Row 65: sl1, k to marker, pm, m1, k to marker, m1, pm, k to end
Row 67: sl1, k1, yo, k2tog, k to marker, pm, m1, k to marker, m1, pm, k to last 4 sts, ssl, yo, k2
Row 69: Repeat row 65
Row 71: Repeat row 67
Row 73: Repeat row 65 (you should have 34 sts with 14 between the markers)
Row 75: sl1, k1, yo, k2tog, k to marker, place 14 sts on stitch holder and remove markers, co2 stitches (backloop method), k to last 4 sts, ssk, yo, k2
Row 77: sl1, knit to end
Row 79: sl1, k1, yo, k2tog, k to last 4 sts, ssk, yo, k2
Row 81: sl 1, knit to end
Row 82: Bind off knitwise from wrong side
Thumb
Put 14 sts from stitch marker onto DPNs, pick up 2 co stitches and 1 stitch on either side of the co stitches to close up the gap, 18 stitches, put 6 stitches on each needle.
Knit 2 rounds
Do 1 round of *k1, k2tog* (12 sts)
Knit 2 rounds
Bind off purlwise
Assembly
Sew in all the ends.
Weave the ribbon into the eyelet holes, always insert the ribbon into each eyelet from the underside for consistency. You can start at either the wrist or elbow depending on where you want the bow and tails. I started at the wrist so the bows were at my elbow.
And that's it! If you find any errors please let me know so I can fix them. This is my first time typing a pattern.
This is not my original design. All credit goes to Ysolda Teague. I just resized it to fit me.
Have fun with the pattern mods,
Cali
No comments:
Post a Comment